【技术备忘录】Ubuntu下网络代理配置踩坑记录
Linux下使用代理的配置方法较为特殊,坑点很多,因此记录下来以备不时之需。

使用代理本身就不应该是一件需要花大精力重点研究的事情,这纯粹是人为因素给编程初学者们造成的不必要的门槛。在这件事上更应该追求短平快的效率。
免责声明:本博客仅供技术分享、学习参考用途,严禁用于非学术用途、违反国家有关法律法规的行为。读者行为与本文作者无关,本文作者不对读者的任何行为负责。
Ubuntu下的代理配置比起Windows下的代理配置要麻烦很多,因为Linux的网络服务结构跟Windows完全不一样。
按照网上的说法,Linux下不支持类似Windows的全局代理功能,这给使用统一的代理软件造成了不小的麻烦。但是我又是一个Windows和Linux双系统用户,且PC终端设备很多,如果每个设备都需要一套单独的配置方法或本地配置文件,实在是难以维护,而且数据同步也是一个不小的麻烦。
所以,我一直在尝试找一个能够将多个平台统一起来的代理配置方法,以最小化配置成本,减少复刻的复杂度。
SSH 一句话代理
可以利用SSH的动态端口转发来快速在本机搭建安全的SOCKS代理,此方法几乎没有配置成本。
1
ssh -D <local_port> <user>@<ip> [-p <ssh_port>]
建立SSH连接之后,就会在本地的socks5://127.0.0.1:<local_port>启动SOCKS5代理服务器,利用Proxy SwitchyOmega等插件切换浏览器的代理服务器即可实现代理,这时浏览器的所有流量都会被SSH隧道接管,出口IP也变成了目标SSH机器的IP,这对于在不装VPN客户端的情况下跨域访问内网很有帮助。
可以通过简单的新建情景模式的方法来处理代理IP切换,还可以支持GFWList等规则,还是很方便的。规则列表下载链接:
1
https://raw.githubusercontent.com/gfwlist/gfwlist/master/gfwlist.txt
Clash Verge Rev
截至目前,能跨Windows,Linux平台部署的统一代理软件里比较优秀的应该只有Clash Verge Rev了。
我作为用户最直观感受到的优缺点:
优点:
- 现代化的GUI界面,包含了测速、出口IP查询、流量统计等功能,功能强大。
- 简单易上手,只需要配置订阅链接、打开代理开关就行。
- 文档较人性化,对新手较为友好。
缺点:
- 官方说不能部署在没有GUI的设备上,因此Linux服务器就没法用这个客户端了。
- TUN模式下接管流量有可能导致系统网络不稳定,尤其是节点网络质量不好的时候。
- (待定)默认配置下,不支持系统代理+
proxychains等命令行代理工具联用,有可能是防火墙设置问题,只能使用TUN模式作替代。 - Clash兼容节点自建较为复杂,没有成熟的一键配置脚本。
在目前的简单配置下,Clash Verge Rev不支持与
proxychains等命令行代理工具共同配合使用,只能使用TUN模式,代理命令行流量。
DONE:使用TUN模式有概率导致系统DNS不可用,网上暂时搜不到类似问题的处理方式,官方文档和issue中暂时没有对口解决方案。Clash Verge Rev官方目前不打算修改系统代理模式下自动设置命令行环境变量的问题,而是要求用户自己配置代理作用范围。并不是每个人对Linux都有这么深入的技术理解,但是毕竟技不如人,挨打立正吧。
安装
- 到Release页面下载对应的
.deb安装包; - 使用
apt进行安装(这里安装的是V2.3.2版本);1
sudo apt install ./Clash.Verge_2.3.2_amd64.deb
- 安装完毕后,会在应用列表中看到
Clash Verge图标已经出现,点击运行即可。
简单使用
Clash Verge主要有2种模式,一种是系统代理模式,另一种是TUN模式。
- 系统代理模式:只修改系统设置中的代理配置,适用于大多数浏览器访问网页的代理。
- TUN模式(虚拟网卡模式):创建一张虚拟网卡,作为专用Tunnel接管计算机上的所有流量,从而实现对命令行等应用程序流量的接管,实现系统级全局Clash核心流量代理。
切换TUN模式会导致机器出现瞬间断网的情况,这在服务器远程连接配置场景下有时候是很致命的(例如进行大文件下载或者
git clone操作的时候,切换节点导致下载中断),甚至有可能导致物理机断网,在无法物理访问服务器的时候,慎用。
Windows下多出口网卡,例如安装了虚拟机网卡的情况下,需要将虚拟网卡模式设置中的“自动设置全局路由”和“自动选择流量出口接口”两个开关都关掉才能正常使用TUN模式,否则会因为路由错误将流量发送到无法联网的接口上导致无法上网。
有关启用TUN模式后系统DNS解析异常的问题
这种情况下需要修改订阅->全局扩展覆写配置中的dns字段,以恢复使用系统DNS,而不是订阅配置文件中的替代DNS,如果没有则新建该字段,配置如下:
1
2
3
dns:
  enable: false
  use-system-hosts: true
WebUI
WebUI适用于无法访问目标机器GUI、只能通过SSH访问的情况,提供了常用的配置功能(包括启用或关闭TUN模式、更换节点、节点测速等),但是不支持像在桌面环境下一样切换订阅文件。
目前Clash Verge Rev自带3种WebUI,其链接分别如下:
1
2
3
4
5
https://metacubex.github.io/metacubexd/#/setup?http=true&hostname=%host&port=%port&secret=%secret

https://yacd.metacubex.one/?hostname=%host&port=%port&secret=%secret

https://board.zash.run.place/#/setup?http=true&hostname=%host&port=%port&secret=%secret
将其中的%host和%port分别替换为自己机器上Clash Verge Rev的对应值即可,默认为127.0.0.1和9997。
访问WebUI之前,需要提前做好SSH端口映射,可以使用VSCode等IDE自带的端口映射功能,或者使用ssh命令:
1
ssh -L 9997:127.0.0.1:9997 user@remote_host
其中,user为远程主机用户名,remote_host为远程主机地址。这样即可将远程主机的9997端口映射到本地的9997端口,随后利用上述链接即可在浏览器中访问WebUI。
临时订阅获取
可以到TG频道订阅分享中心获取一个别人投稿的临期订阅救急(但是前提是还是能够科学上网)。
V2RayA
V2RayA是一个易用而强大的,跨平台的 V2Ray 客户端(官方介绍)。
我作为用户最直观感受到的优缺点:
优点:
- 支持没有GUI界面的Linux服务器。
- 支持与233Boy V2Ray一键配置脚本配合实现低配置成本自建节点(网上很少有有效的Clash自建节点并导出订阅的教程)。
- 支持多节点负载均衡。
- 支持与
proxychains命令行代理工具配合使用。
缺点:
- 配置较繁琐,配置项名称和内容都缺乏直观性,同时文档不够全面,尤其缺乏对配置页面关键配置项含义的说明(
用户文档->手册栏有挺多TODO),对小白而言不算很友好。 - 启用透明代理后
apt update命令工作将不正常,无法正确拉取仓库元数据。 - 在启动或停止V2RayA透明代理服务时,整机所有应用的网络均会中断,断网时长不确定。
- 在V2RayA透明代理运行时,添加或删除分流节点时响应缓慢,而且不支持同时处理多个请求,只能一个个等。
- 不支持某些应用的代理(例如Zoom Workplace),即使在应用中专门设置代理配置之后也无法正确登录。
TODO:挨个查阅issue & 阅读源码也许是一个理解配置的方式,但是太费力了,我认为就为了使用一个代理工具这么做不值得。
自建节点服务端配置
具体可以参照233Boy V2Ray一键配置脚本教程,非常简单。
需要购买一台具有公网IP的、中国大陆地区以外的VPS用于代理流量转发,要配置为Linux实例。
安装
1
bash <(wget -qO- -o- https://git.io/v2ray.sh)
配置
1
v2ray
然后根据提示选择选项进行配置,在配置完毕后即可获取V2RayA中可使用的订阅链接。
客户端安装与配置
安装
旧的apt源安装方法已于2025年9月15日随着v2raya的apt源公钥过期而失效。
如果网络条件允许,可以尝试更换这里的源再试,或者直接从GitHub Releases下载然后直接使用deb包安装即可。
1
2
3
4
5
6
7
8
9
10
11
12
13
sudo apt update
sudo apt install curl gpg
cat <<- EOL | sudo tee /etc/apt/sources.list.d/daeuniverse.sources
Types: deb
URIs: https://daeuniverse.pages.dev
Suites: goose
Components: honk
Architectures: amd64 arm64 i386 riscv64
Signed-By: /usr/share/keyrings/daeuniverse-archive-goose.gpg
EOL
curl -fsSL https://daeuniverse.pages.dev/public-key.asc | sudo gpg --dearmor -o /usr/share/keyrings/daeuniverse-archive-goose.gpg
sudo apt update
sudo apt install v2raya v2ray -y
注意,新版本的V2RayA默认使用xray内核而非v2ray,不支持同时选择多个节点进行冗余,需要使用sudo systemctl edit v2raya修改/usr/lib/systemd/system/v2raya.service文件中的以下条目换回去:
1
2
3
4
5
6
7
### Editing /etc/systemd/system/v2raya.service.d/override.conf
### Anything between here and the comment below will become the contents of the drop-in file

[Service]
Environment=V2RAYA_V2RAY_BIN=/usr/local/bin/v2ray

### Edits below this comment will be discarded
这里的/usr/local/bin/v2ray的位置要根据你的计算机上实际的安装目录进行更改,可以使用which v2ray命令确定具体位置。
修改完毕后,重新载入服务配置并重启服务:
1
2
sudo systemctl daemon-reload
sudo systemctl restart v2raya
##### 失效的旧安装方法 V2RayA官方安装教程文档 将使用的命令总结如下:
1
2
3
4
5
6
wget -qO - https://apt.v2raya.org/key/public-key.asc | sudo tee /etc/apt/keyrings/v2raya.asc
echo "deb [signed-by=/etc/apt/keyrings/v2raya.asc] https://apt.v2raya.org/ v2raya main" | sudo tee /etc/apt/sources.list.d/v2raya.list
sudo apt update
sudo apt install v2raya v2ray ## 也可以使用 xray 包
sudo systemctl start v2raya.service
sudo systemctl enable v2raya.service
配置
开启/关闭透明代理服务会导致机器出现瞬间断网的情况,这在服务器远程连接配置场景下有时候是很致命的(例如进行大文件下载或者
git clone操作的时候,切换节点导致下载中断),甚至有可能导致物理机断网,在无法物理访问服务器的时候,慎用。
- 安装完毕后,默认会在http://localhost:2017启动WebUI;
- 登录WebUI,在WebUI创建用户名及密码
注意:如果使用SSH方式访问远程机器,则需要跟上面访问Clash Verge Rev的方式一样一样进行端口转发。
- 导入自建节点链接或订阅地址,然后选择节点;
点击右上角“设置”配置规则:
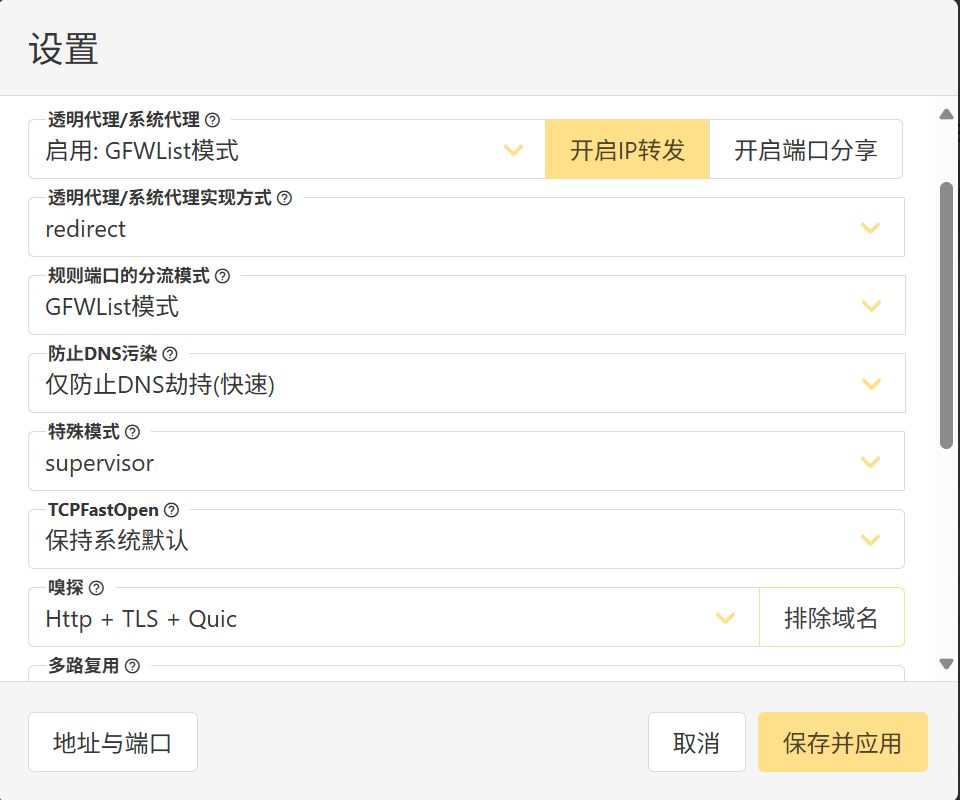
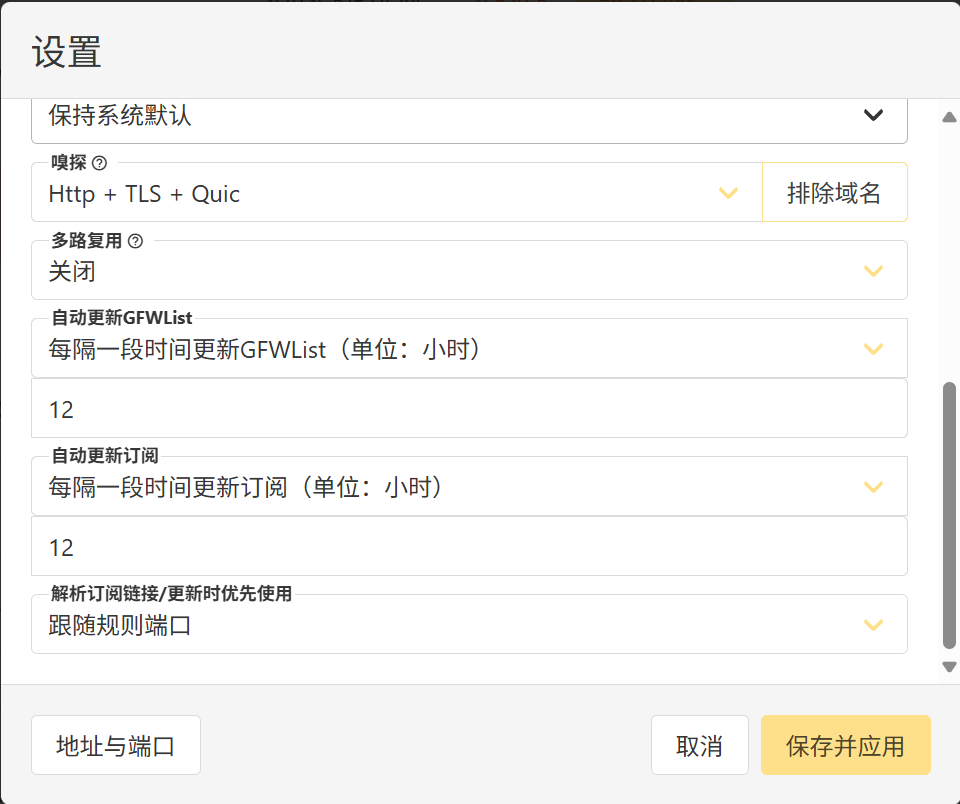
- 最后点击左上角的粉红色“就绪”按钮启动服务即可启用透明代理。
如果需要使用
system tun模式转发全局系统流量,则必须在ufw中增加放通tun0的规则,否则将无法联网。
启用透明代理后,即可在浏览器、终端等位置使用透明代理,如果终端使用透明代理无效的,可以考虑使用TUN模式。三种TUN模式的区别可以看这里。
也可以设置HTTP/SOCKS5代理,用户名密码留空,使用Clash ALLOW LAN的方式使用局域网内部署并开放了混合代理端口的设备来进行流量转发!V2Ray最强大的一点是可以转发正在运行的Docker daemon的流量而无需修改daemon设置并重启Docker daemon!这点真的很强!
使用ALLOW LAN模式需要配好防火墙,同时要注意HTTP和SOCKS5本身是不加密的,所以明文内容最好不要用这种方式进行代理,但是加密流量可以! TODO:目前我使用的Clash Verge Rev客户端没有给混合代理端口配置用户名密码的方式,安全性可能有问题,目前只能使用防火墙进行限制,所以这里标记一个TODO,看看未来能不能用用户名密码鉴权吧。
S-UI
S-UI是一个可以在VPS上搭建代理节点服务端的一个面板应用,支持Shadowsocks、VMess、Trojan等多种主流协议。 开源地址:S-UI
安装
1
bash <(curl -Ls https://raw.githubusercontent.com/alireza0/s-ui/master/install.sh)
然后根据提示修改配置项安装即可。我只修改了admin credentials选项,设置了登录面板使用的用户名和密码。
配置
- 命令行配置
1
s-ui
然后根据提示选择选项进行配置即可获取V2RayA中可使用的订阅。
- WebUI配置
安装完毕后,只要没有在安装过程中修改配置,默认的WebUI地址为:http://localhost:2095/app。 访问该地址然后使用安装阶段设置的用户名和密码即可登录。
- TLS设置
参照图中设置即可,需要配置TLS和REALITY两个TLS配置。 

- 代理入站设置
在登录面板后,按照图中设置vless,hysteria和hysteria2三种协议的入站(亲测只有这3种好用,同时需要放通防火墙的UDP1025-65535全部端口): 


- 设置用户与获取订阅链接
在用户设置中添加用户:  随后就可以点击二维码图标查看订阅二维码了。点击二维码可以复制对应的订阅链接,可以在支持订阅的客户端里导入。
- 面板动态域名设置
到ClouDNS上注册一个账号,然后在Dashboard界面用createe zone按钮创建一个新的免费DDNS域名,然后添加一个A记录指向自己的VPS IP: 

也可以用dynv6配置DDNS,操作更为简便,而且每个账户没有ClouDNS那样严格的1个域名的限制。
- 域名SSL证书申请与应用
在s-ui命令行界面选择19为域名申请证书,申请完毕后脚本会告知申请的SSL证书文件路径在哪里,记录下来然后输入面板的设置里: 
 保存后重启面板,即可使用配置的域名+端口号,以
https形式访问面板了。
- 整合多个节点实现自建机场一个订阅包含所有节点
可以在用户管理中新建一个用户,然后编辑,在“链接”选项卡中添加别的节点的外部订阅链接:  但是注意,每个入站规则名称要不一样,否则出现重名,客户端将无法使用订阅!
以上方法搭建的节点没有国内流量免代理自动分流规则。
Clash for Linux (已停更)
Clash for Linux已经停更了,所以它已经没有文档支持了,但是在Linux下如果使用proxychains等命令行代理工具的话,其还是一个较好的选择。
安装与配置方法
下载项目
1
$ git clone https://github.com/Elegycloud/clash-for-linux-backup.git
进入到项目目录,编辑.env文件,修改变量CLASH_URL的值。
1
2
$ cd clash-for-linux
$ vim .env
注意:
.env文件中的变量CLASH_SECRET为自定义 Clash Secret,值为空时,脚本将自动生成随机字符串。
启动程序
直接运行脚本文件start.sh
- 进入项目目录
1
$ cd clash-for-linux
- 运行启动脚本
1
2
3
4
5
6
7
8
9
10
11
12
13
14
15
16
17
18
19
20
$ sudo bash start.sh

正在检测订阅地址...
Clash订阅地址可访问!                                      [  OK  ]

正在下载Clash配置文件...
配置文件config.yaml下载成功!                              [  OK  ]

正在启动Clash服务...
服务启动成功!                                             [  OK  ]

Clash Dashboard 访问地址:http://<ip>:9090/ui
Secret:xxxxxxxxxxxxx

请执行以下命令加载环境变量: source /etc/profile.d/clash.sh

请执行以下命令开启系统代理: proxy_on

若要临时关闭系统代理,请执行: proxy_off
1
2
$ source /etc/profile.d/clash.sh
$ proxy_on
- 检查服务端口
1
2
3
4
5
$ netstat -tln | grep -E '9090|789.'
tcp        0      0 127.0.0.1:9090          0.0.0.0:*               LISTEN
tcp6       0      0 :::7890                 :::*                    LISTEN
tcp6       0      0 :::7891                 :::*                    LISTEN
tcp6       0      0 :::7892                 :::*                    LISTEN
- 检查环境变量
1
2
3
$ env | grep -E 'http_proxy|https_proxy'
http_proxy=http://127.0.0.1:7890
https_proxy=http://127.0.0.1:7890
以上步鄹如果正常,说明服务clash程序启动成功,现在就可以体验高速下载github资源了。
重启程序
如果需要对Clash配置进行修改,请修改 conf/config.yaml 文件。然后运行 restart.sh 脚本进行重启。
注意: 重启脚本
restart.sh不会更新订阅信息。
停止程序
- 进入项目目录
1
$ cd clash-for-linux
- 关闭服务
1
$ sudo bash shutdown.sh
服务关闭成功,请执行以下命令关闭系统代理:proxy_off
1
$ proxy_off
然后检查程序端口、进程以及环境变量http_proxy|https_proxy,若都没则说明服务正常关闭。
Clash Dashboard
- 访问 Clash Dashboard
通过浏览器访问 start.sh 执行成功后输出的地址,例如:http://192.168.0.1:9090/ui
- 登录管理界面
在API Base URL一栏中输入:http://<ip>:9090 ,在Secret(optional)一栏中输入启动成功后输出的Secret。
点击Add并选择刚刚输入的管理界面地址,之后便可在浏览器上进行一些配置。
- 更多教程
此 Clash Dashboard 使用的是yacd项目,详细使用方法请移步到yacd上查询。
终端界面选择代理节点
部分用户无法通过浏览器使用 Clash Dashboard 进行节点选择、代理模式修改等操作,为了方便用户可以在Linux终端进行操作,下面提供了一个功能简单的脚本以便用户可以临时通过终端界面进行配置。
脚本存放位置:scripts/clash_proxy-selector.sh
注意:
使用脚本前,需要修改脚本中的 Secret 变量值为上述启动脚本输出的值,或者与
.env文件中定义的 CLASH_SECRET 变量值保持一致。
配置为服务
将以下的clash.service放到/etc/systemd/system下,然后执行sudo systemctl enable calsh和sudo systemctl start clash即可将Clash for Linux配置为开机自启的服务,但是一定要确保.env中的订阅链接是有效的,否则有可能导致服务器重启的时候卡在Clash服务启动这一步。
1
2
3
4
5
6
7
8
9
10
11
12
13
14
15
16
17
18
19
20
[Unit]
Description=Clash Core
After=network.target
Wants=network.target

[Service]
Type=forking
WorkingDirectory=/home/wfy/clash-for-linux/
ExecStart=/home/wfy/clash-for-linux/start.sh
ExecStop=/home/wfy/clash-for-linux/shutdown.sh
ExecStartPost=
ExecStopPost=
PrivateTmp=false
Restart=on-failure
RestartSec=10
User=root
Group=root

[Install]
WantedBy=multi-user.target
命令行代理:proxychains
proxychains是Linux下一个常用的命令行代理工具,可以为在终端中执行的命令指定网络代理,其原理应该是在要执行的命令前动态链接其自己的共享.so库,这样就可以劫持所执行的命令的网络流量,然后将这些网络流量转发到配置的代理服务器。 proxychains和上述的V2RayA联用,可以强制为某些不走透明代理的命令强行显示指定使用代理,从而实现网络加速。同时,使用proxychains也可以灵活地决定哪些命令使用代理哪些不使用代理,灵活度更高。
安装
1
sudo apt install proxychains4
配置
安装完毕后,编辑/etc/proxychains4.conf文件,主要修改点有:
- 将默认的
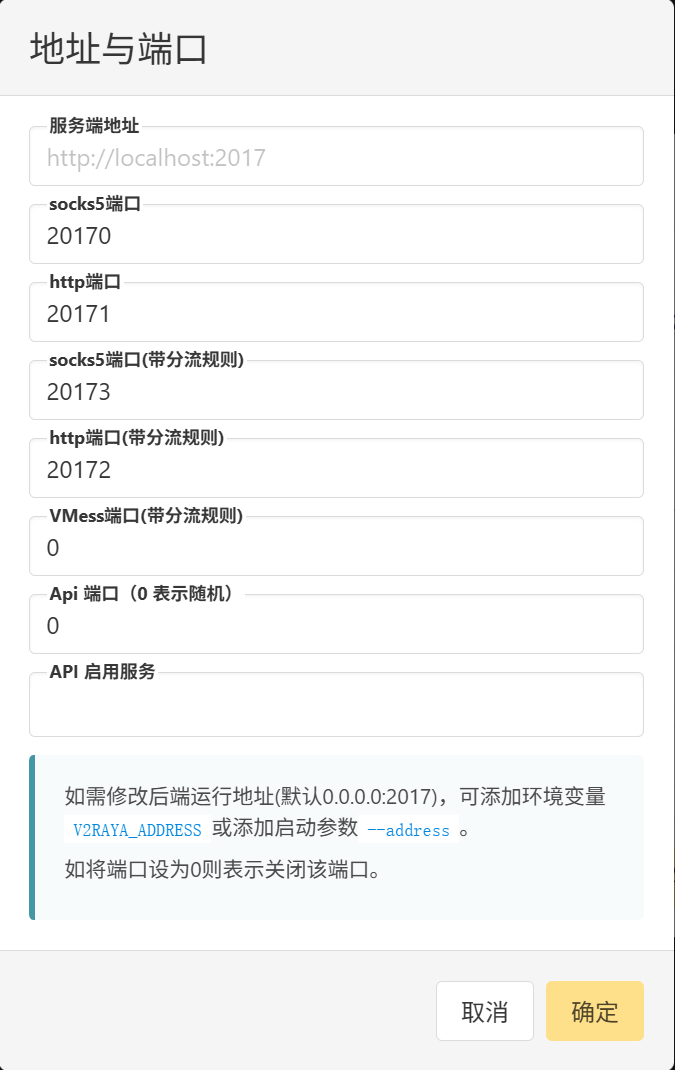
strict_chain注释掉(启用该选项要求文件最后配置的所有代理都有效,否则代理链失效将不能正常进行代理),然后取消dynamic_chain(文件最后配置的任意一条代理有效都可以实现命令行代理)的注释; - 在文件最后根据之前在
V2RayA中配置的代理方式、代理服务器地址及端口号配置代理链设置,例如我的设置就是socks5 127.0.0.1 20173,这里配置一条有效的就够用了。
1
2
3
4
5
6
7
8
9
10
11
12
13
14
15
16
17
18
19
20
21
22
23
24
25
26
27
28
29
30
31
32
33
34
35
36
37
38
39
40
41
42
43
44
45
46
47
48
49
50
51
52
53
54
55
56
57
58
59
60
61
62
63
64
65
66
67
68
69
70
71
72
73
74
75
76
77
78
79
80
81
82
83
84
85
86
87
88
89
90
91
92
93
94
95
96
97
98
99
100
101
102
103
104
105
106
107
108
109
110
111
112
113
114
115
116
117
118
119
120
121
122
123
124
125
126
127
128
129
130
131
132
133
134
135
136
137
138
139
140
141
142
143
144
145
146
147
148
149
150
151
152
153
154
155
156
157
158
159
160
161
# proxychains.conf  VER 4.x
#
#        HTTP, SOCKS4a, SOCKS5 tunneling proxifier with DNS.


# The option below identifies how the ProxyList is treated.
# only one option should be uncommented at time,
# otherwise the last appearing option will be accepted
#
dynamic_chain
#
# Dynamic - Each connection will be done via chained proxies
# all proxies chained in the order as they appear in the list
# at least one proxy must be online to play in chain
# (dead proxies are skipped)
# otherwise EINTR is returned to the app
#
#strict_chain
#
# Strict - Each connection will be done via chained proxies
# all proxies chained in the order as they appear in the list
# all proxies must be online to play in chain
# otherwise EINTR is returned to the app
#
#round_robin_chain
#
# Round Robin - Each connection will be done via chained proxies
# of chain_len length
# all proxies chained in the order as they appear in the list
# at least one proxy must be online to play in chain
# (dead proxies are skipped).
# the start of the current proxy chain is the proxy after the last
# proxy in the previously invoked proxy chain.
# if the end of the proxy chain is reached while looking for proxies
# start at the beginning again.
# otherwise EINTR is returned to the app
# These semantics are not guaranteed in a multithreaded environment.
#
#random_chain
#
# Random - Each connection will be done via random proxy
# (or proxy chain, see  chain_len) from the list.
# this option is good to test your IDS :)

# Make sense only if random_chain or round_robin_chain
#chain_len = 2

# Quiet mode (no output from library)
#quiet_mode

## Proxy DNS requests - no leak for DNS data
# (disable all of the 3 items below to not proxy your DNS requests)

# method 1. this uses the proxychains4 style method to do remote dns:
# a thread is spawned that serves DNS requests and hands down an ip
# assigned from an internal list (via remote_dns_subnet).
# this is the easiest (setup-wise) and fastest method, however on
# systems with buggy libcs and very complex software like webbrowsers
# this might not work and/or cause crashes.
proxy_dns

# method 2. use the old proxyresolv script to proxy DNS requests
# in proxychains 3.1 style. requires `proxyresolv` in $PATH
# plus a dynamically linked `dig` binary.
# this is a lot slower than `proxy_dns`, doesn't support .onion URLs,
# but might be more compatible with complex software like webbrowsers.
#proxy_dns_old

# method 3. use proxychains4-daemon process to serve remote DNS requests.
# this is similar to the threaded `proxy_dns` method, however it requires
# that proxychains4-daemon is already running on the specified address.
# on the plus side it doesn't do malloc/threads so it should be quite
# compatible with complex, async-unsafe software.
# note that if you don't start proxychains4-daemon before using this,
# the process will simply hang.
#proxy_dns_daemon 127.0.0.1:1053

# set the class A subnet number to use for the internal remote DNS mapping
# we use the reserved 224.x.x.x range by default,
# if the proxified app does a DNS request, we will return an IP from that range.
# on further accesses to this ip we will send the saved DNS name to the proxy.
# in case some control-freak app checks the returned ip, and denies to
# connect, you can use another subnet, e.g. 10.x.x.x or 127.x.x.x.
# of course you should make sure that the proxified app does not need
# *real* access to this subnet.
# i.e. dont use the same subnet then in the localnet section
#remote_dns_subnet 127
#remote_dns_subnet 10
remote_dns_subnet 224

# Some timeouts in milliseconds
tcp_read_time_out 15000
tcp_connect_time_out 8000

### Examples for localnet exclusion
## localnet ranges will *not* use a proxy to connect.
## note that localnet works only when plain IP addresses are passed to the app,
## the hostname resolves via /etc/hosts, or proxy_dns is disabled or proxy_dns_old used.

## Exclude connections to 192.168.1.0/24 with port 80
# localnet 192.168.1.0:80/255.255.255.0

## Exclude connections to 192.168.100.0/24
# localnet 192.168.100.0/255.255.255.0

## Exclude connections to ANYwhere with port 80
# localnet 0.0.0.0:80/0.0.0.0
# localnet [::]:80/0

## RFC6890 Loopback address range
## if you enable this, you have to make sure remote_dns_subnet is not 127
## you'll need to enable it if you want to use an application that
## connects to localhost.
# localnet 127.0.0.0/255.0.0.0
# localnet ::1/128

## RFC1918 Private Address Ranges
# localnet 10.0.0.0/255.0.0.0
# localnet 172.16.0.0/255.240.0.0
# localnet 192.168.0.0/255.255.0.0

### Examples for dnat
## Trying to proxy connections to destinations which are dnatted,
## will result in proxying connections to the new given destinations.
## Whenever I connect to 1.1.1.1 on port 1234 actually connect to 1.1.1.2 on port 443
# dnat 1.1.1.1:1234  1.1.1.2:443

## Whenever I connect to 1.1.1.1 on port 443 actually connect to 1.1.1.2 on port 443
## (no need to write :443 again)
# dnat 1.1.1.2:443  1.1.1.2

## No matter what port I connect to on 1.1.1.1 port actually connect to 1.1.1.2 on port 443
# dnat 1.1.1.1  1.1.1.2:443

## Always, instead of connecting to 1.1.1.1, connect to 1.1.1.2
# dnat 1.1.1.1  1.1.1.2

# ProxyList format
#       type  ip  port [user pass]
#       (values separated by 'tab' or 'blank')
#
#       only numeric ipv4 addresses are valid
#
#
#        Examples:
#
#               socks5  192.168.67.78   1080    lamer   secret
#               http    192.168.89.3    8080    justu   hidden
#               socks4  192.168.1.49    1080
#               http    192.168.39.93   8080
#
#
#       proxy types: http, socks4, socks5, raw
#         * raw: The traffic is simply forwarded to the proxy without modification.
#        ( auth types supported: "basic"-http  "user/pass"-socks )
#
[ProxyList]
# add proxy here ...
# meanwile
# defaults set to "tor"
socks5  127.0.0.1 20173
使用
在需要进行代理的命令前加上proxychains4,使用proxychains4 <command>即可使用代理执行命令,例如proxychains git clone <repo>等。当然也可以通过在.bashrc或者.zshrc中配置别名来减少每次需要输入的字母,例如我使用pc:
1
alias pc='function pcxy(){ proxychains4 $* ;}; pcxy'
WSL配置网络代理
参见为 WSL2 设置代理,最主要的设置是关闭Windows到WSL的防火墙,另外要关闭WSL Settings中的“启用localhost转发”开关,不然代理也无法使用:
1
2
3
4
5
6
7
8
9
10
11
12
13
14
15
16
17
18
19
20
21
22
23
24
25
26
27
28
29
30
31
3、关闭Hyper-V虚拟网卡的防火墙

Get-NetFirewallHyperVVMCreator #获取wsl GUID
通常都为{40E0AC32-46A5-438A-A0B2-2B479E8F2E90}, 如果不一样后面的命令都需要替换

Get-NetFirewallHyperVVMSetting -PolicyStore ActiveStore -Name '{40E0AC32-46A5-438A-A0B2-2B479E8F2E90}' # 查看Hyper-V防火墙状态
Name                  : {40E0AC32-46A5-438A-A0B2-2B479E8F2E90}
Enabled               : True
DefaultInboundAction  : Block # 默认拦截 宿主机 发往 Hyper-V 虚拟机(包括 WSL2)的入站连接,拦住了包的返回过程
DefaultOutboundAction : Allow #  WSL2 向外包发送到宿主机默认是允许的
LoopbackEnabled       : True
AllowHostPolicyMerge  : True
关闭Hyper-V防火墙(要使用管理员权限下的Powershell)

Set-NetFirewallHyperVVMSetting -Name '{40E0AC32-46A5-438A-A0B2-2B479E8F2E90}' -Enabled False
4、关闭win11对wsl的防火墙

要使用管理员权限下的Powershell

New-NetFirewallRule -DisplayName "WSL vEthernet inbound" `
  -Direction Inbound `
  -InterfaceAlias "vEthernet (WSL*)" `
  -Action Allow `
  -Profile Any

New-NetFirewallRule -DisplayName "WSL vEthernet outbound" `
  -Direction Outbound `
  -InterfaceAlias "vEthernet (WSL*)" `
  -Action Allow `
  -Profile Any
如果关掉Hyper-V防火墙还是无法访问,检查一下ubuntu的防火墙并进行关闭。
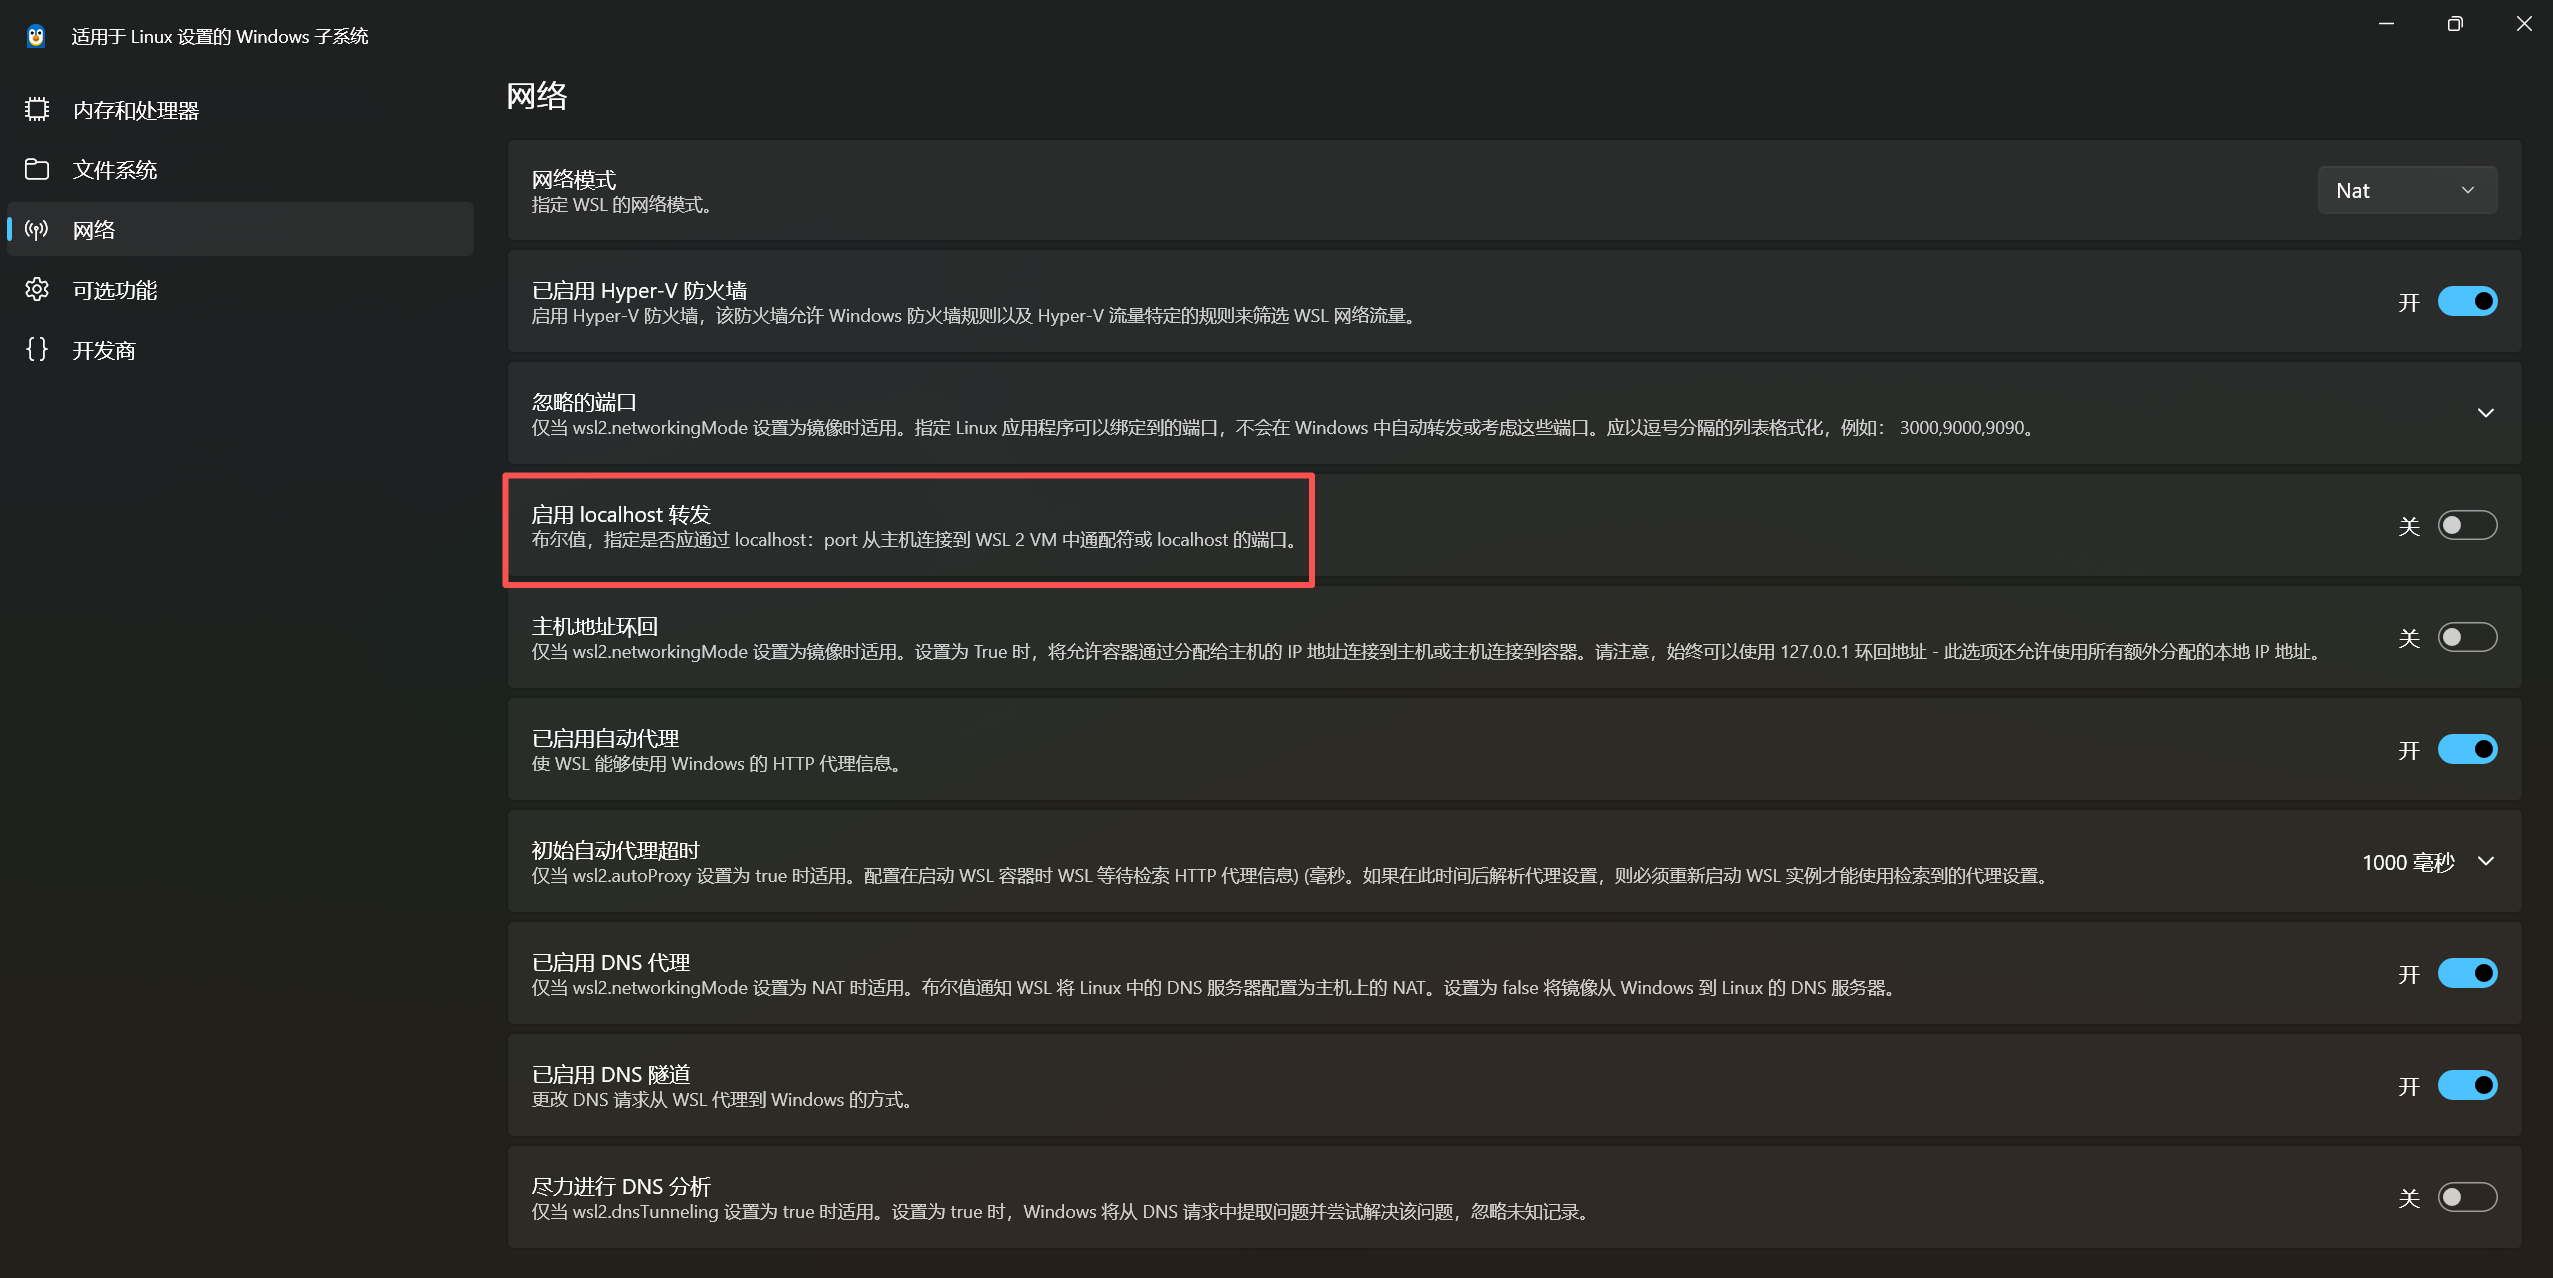 WSL网络设置
配置完毕后在.bashrc或者.zshrc中增加以下条目以自动设置命令行代理环境变量:
1
2
3
4
GW_IP=$(ip route | grep '^default via' | awk '{print $3}')
export HTTP_PROXY="http://$GW_IP:7897"
export HTTPS_PROXY="http://$GW_IP:7897"
export ALL_PROXY="http://$GW_IP:7897"
缺点是这种配置没有proxychains灵活,使用上就跟Clash Verge Rev的系统代理模式一样,因为Clash Verge Rev的系统代理模式也是自动设置命令行代理的环境变量。 这个代理需要首先在主机上使用Clash Verge Rev中开启“局域网连接”选项,但是开启该选项后,有可能在整个内网中都有可能被蹭网,所以需要提前配置好Windows高级安全防火墙规则,简单步骤:
- 禁用Windows防火墙入站规则中默认的两条
verge-mihomoTCP/UDP放通规则; - 在WSL中利用
ifconfig -a检查eth0的网卡地址,然后在“入站规则”中新建两条TCP/UDP放通规则; - 配置“作用域”为查到的
eth0IP地址,默认的本地端口为Clash Verge Rev的混合代理端口7897。
经过以上配置后,就只有WSL可以通过Clash Verge Rev的代理服务访问外网,而无需担心蹭网问题了。
反向代理:frp
使用反向代理本身是一件极具风险的事情,因为它破坏了原有单位内网的独立与隔离性,需要使用者自行承担网络安全风险,如果你无法承担因私自使用反向代理导致所在单位的网络管理制度的惩罚后果,而且确实有远程办公、跨域访问等需要,请不要使用反向代理,并转为寻求使用经过审批的专用VPN等方案。
frp是一个高性能反向代理应用,支持多种协议,包括 TCP、UDP、HTTP、HTTPS 等,并且具备 P2P 通信功能,可以安全、便捷地将内网服务暴露到公网,通过拥有公网 IP 的节点进行中转。 如果需要安全地暴露内网服务,可以参考官方文档:安全地暴露内网服务。这里的为了配置简单使用了默认证书,如果对安全性要求更高的话可以自己去查官方文档来看如何生成。
安装
公网机器和内网机器分别到frp Release页面下载合适版本的frp文件,放到公网机器及内网机器合适的路径下,然后执行解压:
1
tar -xzvf ./frp_<版本>_linux_amd64.tar.gz
配置
为了免于在访问者机器上安装frpc,我使用了SSH ProxyJump+frp的混合转发方式。正常使用STCP方式从客户端访问内网机器的话,需要客户端机器也安装并配置frpc,较为繁琐,因此我这个方案相当于用运行在公网机器上的一个frpc直接将内网机器的ssh端口映射到了公网机器的127.0.0.1的某端口上,这样再结合SSH的ProxyJump功能(就是建立一个SSH加密的从22端口到另一个地址的TCP连接隧道,这里是127.0.0.1:6000),从而避免了直接将内网机器的SSH端口宝路达公网,只需要客户端机器简单配置一下SSH的ProxyJump,免去了下载、配置frpc的麻烦,同时可以保证全隧道连接加密保证访问安全。
frp配置文件
- 公网机器:需要同时运行
frps和frpc
frps.toml:
1
2
bindPort = 7000 # 服务端口
auth.token = "<token>" # 用于保证安全的token,只有与frps.toml中设置一致的frpc才可以连接到该frps,我是使用openssl rand -hex 20命令随机生成的
frpc.toml:
1
2
3
4
5
6
7
8
9
10
11
12
13
14
15
16
17
18
19
20
21
22
23
24
25
26
27
28
29
30
31
32
33
34
35
36
37
38
39
40
41
42
43
serverAddr = "127.0.0.1" # 部署在与frps运行的同一台机器上
serverPort = 7000 # 访问frps的服务端口
auth.token = "<与frps.tml中一致的token>"

# 多台内网机器可以共用一个frps,通过创建多个[[visitors]]字段的方式部署多条隧道,例如这里的写法
# 第一台机器
[[visitors]]
name = "secret_ssh_visitor"
type = "stcp"
# 要访问的 stcp 代理的名字
serverName = "secret_ssh" # 要与内网机器的frpc.toml中设置一致
secretKey = "密码" # 需要与被访问的内网机器该项设置的密码一致才可以访问
# 绑定本地端口以访问 SSH 服务
bindAddr = "127.0.0.1"
bindPort = 6000
transport.useEncryption = true
transport.useCompression = true

# 第二台机器
[[visitors]]
name = "secret_ssh_visitor2"
type = "stcp"
# 要访问的 stcp 代理的名字
serverName = "secret_ssh2"
secretKey = "密码"
# 绑定本地端口以访问 SSH 服务
bindAddr = "127.0.0.1"
bindPort = 6001
transport.useEncryption = true
transport.useCompression = true

# 第二台机器有一个vllm服务也可以加入
[[visitors]]
name = "name3"
type = "stcp"
# 要访问的 stcp 代理的名字
serverName = "vllm"
secretKey = "密码"
# 绑定本地端口以访问 SSH 服务
bindAddr = "0.0.0.0"
bindPort = <port3>
transport.useEncryption = true
transport.useCompression = true
- 内网机器:
frpc.toml:
1
2
3
4
5
6
7
8
9
10
11
12
13
14
15
16
17
18
19
20
21
22
23
24
25
serverAddr = "<公网机器IP>"
serverPort = 7000 # frps服务端口
auth.token = "<与frps.tml中一致的token>"
transport.tls.enable = true

[[proxies]]
name = "secret_ssh" # 配置要被访问的服务名,要与访问者的`frpc.toml`中一致
type = "stcp"
# 只有与此处设置的 secretKey 一致的用户才能访问此服务
secretKey = "密码" # 只有与这里配置的密码一致的frpc才可以访问到此服务
localIP = "127.0.0.1"
localPort = 22
transport.useEncryption = true
transport.useCompression = true

# 这台机器上还有一个vllm服务
[[proxies]]
name = "vllm"
type = "stcp"
# 只有与此处设置的 secretKey 一致的用户才能访问此服务
secretKey = "密码"
localIP = "0.0.0.0"
localPort = 9091
transport.useEncryption = true
transport.useCompression = true
注册为服务
使用sudo vim /etc/systemd/system <name>.service的命令将以下配置文件根据自己需要修改后贴进去:
- 公网机器:需要配置
frps和frpc两个服务- 配置文件:
frps.service:
- 配置文件:
1
2
3
4
5
6
7
8
9
10
11
12
13
14
15
[Unit]
# 服务名称,可自定义
Description = frp server
After = network.target syslog.target
Wants = network.target

[Service]
Type = simple
# 启动frps的命令,需修改为您的frps的安装路径
ExecStart = /etc/frp/frps -c /etc/frp/frps.toml
Restart=on-failure
RestartSec=60

[Install]
WantedBy = multi-user.target
frpc.service:
1
2
3
4
5
6
7
8
9
10
11
12
13
14
15
16
[Unit]
# 服务名称,可自定义
Description = frp client
After = network.target syslog.target
Wants = network.target
After = frps.service

[Service]
Type = simple
# 启动frps的命令,需修改为您的frps的安装路径
ExecStart = /etc/frp/frpc -c /etc/frp/frpc.toml
Restart=on-failure
RestartSec=60

[Install]
WantedBy = multi-user.target
- 启动服务:然后设置服务开机启动并启动服务,注意要先启动
frps再启动frpc:1 2 3 4
sudo systemctl enable frps sudo systemctl enable frpc sudo systemctl start frps sudo systemctl start frpc
- 内网机器:需要配置
frpc服务- 配置文件:
frpc.service:
- 配置文件:
1
2
3
4
5
6
7
8
9
10
11
12
13
14
15
16
[Unit]
# 服务名称,可自定义
Description = frp client
After = network.target syslog.target
Wants = network.target
After = frps.service

[Service]
Type = simple
# 启动frps的命令,需修改为您的frps的安装路径
ExecStart = /etc/frp/frpc -c /etc/frp/frpc.toml
Restart=on-failure
RestartSec=60

[Install]
WantedBy = multi-user.target
- 启动服务:然后设置服务开机启动并启动服务:
1
2
sudo systemctl enable frpc
sudo systemctl start frpc
访问内网机器的客户端机器的SSH配置文件
1
2
3
4
5
6
7
8
9
10
11
12
Host public_machine
  HostName <public_ip>
  User <public_user>
  Port 22
  IdentityFile <public_machine_identity_file>

Host provate_machine
  HostName 127.0.0.1
  User <private_user>
  Port <在public_machine的frpc.toml中配置的port>
  ProxyJump public_machine
  IdentityFile <private_machine_identity_file>
然后就可以在VSCode等IDE或者Terminal中直接通过SSH访问内网机器了。