zsh安装与配置
参考博客与命令:Ubuntu22.04使用zsh+oh my zsh+Powerlevel10k主题 使用命令总结:
1
2
3
4
5
6
7
8
9
10
11
12
13
14
15
16
17
18
19
20
21
22
23
24
25
26
27
28
| # 安装字体
# 使mkfontscale和mkfontdir命令正常运行
sudo apt-get install ttf-mscorefonts-installer
# 使fc-cache命令正常运行
sudo apt-get install fontconfig -y
sudo apt install wget git -y
# git 克隆字体库
git clone https://github.com/ryanoasis/nerd-fonts.git --depth 1
# 打开文件夹
cd nerd-fonts
# 安装字体
./install.sh
# 安装zsh
sudo apt install zsh
# 然后将zsh设置为默认shell:
chsh -s /bin/zsh
# 安装oh-my-zsh
wget https://github.com/robbyrussell/oh-my-zsh/raw/master/tools/install.sh -O - | sh
# 安装powerlevel10k主题
git clone --depth=1 https://github.com/romkatv/powerlevel10k.git ${ZSH_CUSTOM:-$HOME/.oh-my-zsh/custom}/themes/powerlevel10k
# 安装插件
sudo apt install autojump
git clone https://gitee.com/zsh-users/zsh-autosuggestions ${ZSH_CUSTOM:-~/.oh-my-zsh/custom}/plugins/zsh-autosuggestions
git clone https://gitee.com/zsh-users/zsh-syntax-highlighting.git ${ZSH_CUSTOM:-~/.oh-my-zsh/custom}/plugins/zsh-syntax-highlighting
# 使安装的插件生效
source ~/.zshrc
# 配置powerlevel10k主题,根据提示及个人偏好进行配置即可
p10k configure
|
.zshrc配置文件存档:
1
2
3
4
5
6
7
8
9
10
11
12
13
14
15
16
17
18
19
20
21
22
23
24
25
26
27
28
29
30
31
32
33
34
35
36
37
38
39
40
41
42
43
44
45
46
47
48
49
50
51
52
53
54
55
56
57
58
59
60
61
62
63
64
65
66
67
68
69
70
71
72
73
74
75
76
77
78
79
80
81
82
83
84
85
86
87
88
89
90
91
92
93
94
95
96
97
98
99
100
101
102
103
104
105
106
107
108
109
110
111
112
113
114
115
116
117
118
119
120
121
122
123
124
125
126
127
128
129
130
131
132
133
134
135
136
137
138
139
140
141
142
143
144
145
146
147
148
149
150
151
152
153
| # Enable Powerlevel10k instant prompt. Should stay close to the top of ~/.zshrc.
# Initialization code that may require console input (password prompts, [y/n]
# confirmations, etc.) must go above this block; everything else may go below.
if [[ -r "${XDG_CACHE_HOME:-$HOME/.cache}/p10k-instant-prompt-${(%):-%n}.zsh" ]]; then
source "${XDG_CACHE_HOME:-$HOME/.cache}/p10k-instant-prompt-${(%):-%n}.zsh"
fi
# If you come from bash you might have to change your $PATH.
# export PATH=$HOME/bin:$HOME/.local/bin:/usr/local/bin:$PATH
# Path to your Oh My Zsh installation.
export ZSH="$HOME/.oh-my-zsh"
# Set name of the theme to load --- if set to "random", it will
# load a random theme each time Oh My Zsh is loaded, in which case,
# to know which specific one was loaded, run: echo $RANDOM_THEME
# See https://github.com/ohmyzsh/ohmyzsh/wiki/Themes
ZSH_THEME="powerlevel10k/powerlevel10k"
# Set list of themes to pick from when loading at random
# Setting this variable when ZSH_THEME=random will cause zsh to load
# a theme from this variable instead of looking in $ZSH/themes/
# If set to an empty array, this variable will have no effect.
# ZSH_THEME_RANDOM_CANDIDATES=( "robbyrussell" "agnoster" )
# Uncomment the following line to use case-sensitive completion.
# CASE_SENSITIVE="true"
# Uncomment the following line to use hyphen-insensitive completion.
# Case-sensitive completion must be off. _ and - will be interchangeable.
# HYPHEN_INSENSITIVE="true"
# Uncomment one of the following lines to change the auto-update behavior
# zstyle ':omz:update' mode disabled # disable automatic updates
# zstyle ':omz:update' mode auto # update automatically without asking
# zstyle ':omz:update' mode reminder # just remind me to update when it's time
# Uncomment the following line to change how often to auto-update (in days).
# zstyle ':omz:update' frequency 13
# Uncomment the following line if pasting URLs and other text is messed up.
# DISABLE_MAGIC_FUNCTIONS="true"
# Uncomment the following line to disable colors in ls.
# DISABLE_LS_COLORS="true"
# Uncomment the following line to disable auto-setting terminal title.
# DISABLE_AUTO_TITLE="true"
# Uncomment the following line to enable command auto-correction.
# ENABLE_CORRECTION="true"
# Uncomment the following line to display red dots whilst waiting for completion.
# You can also set it to another string to have that shown instead of the default red dots.
# e.g. COMPLETION_WAITING_DOTS="%F{yellow}waiting...%f"
# Caution: this setting can cause issues with multiline prompts in zsh < 5.7.1 (see #5765)
# COMPLETION_WAITING_DOTS="true"
# Uncomment the following line if you want to disable marking untracked files
# under VCS as dirty. This makes repository status check for large repositories
# much, much faster.
# DISABLE_UNTRACKED_FILES_DIRTY="true"
# Uncomment the following line if you want to change the command execution time
# stamp shown in the history command output.
# You can set one of the optional three formats:
# "mm/dd/yyyy"|"dd.mm.yyyy"|"yyyy-mm-dd"
# or set a custom format using the strftime function format specifications,
# see 'man strftime' for details.
# HIST_STAMPS="mm/dd/yyyy"
# Would you like to use another custom folder than $ZSH/custom?
# ZSH_CUSTOM=/path/to/new-custom-folder
# Which plugins would you like to load?
# Standard plugins can be found in $ZSH/plugins/
# Custom plugins may be added to $ZSH_CUSTOM/plugins/
# Example format: plugins=(rails git textmate ruby lighthouse)
# Add wisely, as too many plugins slow down shell startup.
# 启动错误命令自动更正
ENABLE_CORRECTION="true"
# 在命令执行过程中,使用小红点进行提示
COMPLETION_WAITING_DOTS="true"
# 启用已安装的主题
plugins=(
git extract autojump zsh-autosuggestions zsh-syntax-highlighting
)
source $ZSH/oh-my-zsh.sh
# User configuration
# export MANPATH="/usr/local/man:$MANPATH"
# You may need to manually set your language environment
# export LANG=en_US.UTF-8
# Preferred editor for local and remote sessions
# if [[ -n $SSH_CONNECTION ]]; then
# export EDITOR='vim'
# else
# export EDITOR='nvim'
# fi
# Compilation flags
# export ARCHFLAGS="-arch $(uname -m)"
# Set personal aliases, overriding those provided by Oh My Zsh libs,
# plugins, and themes. Aliases can be placed here, though Oh My Zsh
# users are encouraged to define aliases within a top-level file in
# the $ZSH_CUSTOM folder, with .zsh extension. Examples:
# - $ZSH_CUSTOM/aliases.zsh
# - $ZSH_CUSTOM/macos.zsh
# For a full list of active aliases, run `alias`.
#
# Example aliases
# alias zshconfig="mate ~/.zshrc"
# alias ohmyzsh="mate ~/.oh-my-zsh"
alias ta='function taf(){tmux attach -t $1 ; };taf'
alias pc='function pcxy(){ proxychains4 $* ;}; pcxy'
# To customize prompt, run `p10k configure` or edit ~/.p10k.zsh.
[[ ! -f ~/.p10k.zsh ]] || source ~/.p10k.zsh
# >>> conda initialize >>>
# !! Contents within this block are managed by 'conda init' !!
__conda_setup="$('/home/wfy/anaconda3/bin/conda' 'shell.zsh' 'hook' 2> /dev/null)"
if [ $? -eq 0 ]; then
eval "$__conda_setup"
else
if [ -f "/home/wfy/anaconda3/etc/profile.d/conda.sh" ]; then
. "/home/wfy/anaconda3/etc/profile.d/conda.sh"
else
export PATH="/home/wfy/anaconda3/bin:$PATH"
fi
fi
unset __conda_setup
# <<< conda initialize <<<
export LD_LIBRARY_PATH=/usr/local/cuda/lib64:$LD_LIBRARY_PATH
export PATH=/home/wfy/.local/bin:$PATH
export NVM_DIR="$HOME/.nvm"
[ -s "$NVM_DIR/nvm.sh" ] && \. "$NVM_DIR/nvm.sh" # This loads nvm
[ -s "$NVM_DIR/bash_completion" ] && \. "$NVM_DIR/bash_completion" # This loads nvm bash_completion
# Install Ruby Gems to ~/gems
export GEM_HOME="$HOME/gems"
export PATH="$HOME/gems/bin:$PATH"
# export JEKYLL_EDITOR=vim
|
sudo超时及免密设置
- 无限超时时长设置(即第一次使用
sudo输入密码验证后,多久时间内无需再次输入sudo密码) 将文件第一行的内容修改如下,增加timestamp_timeout=-1标志:1
| Defaults env_reset, timestamp_timeout=-1
|
- 免密 在文件最后一行添加:
1
| your_username ALL=(ALL) NOPASSWD:ALL
|
保存退出。
SSH配置
新安装的Ubuntu系统默认使能OpenSSH Server,但是需要配置免密码等操作以方便登录使用。配置步骤:
- 本机生成密钥对
然后根据提示和自己的需要,设置密钥对存储路径、口令(passphrase)等。口令是给密钥对加的又一层密码,可以防止密钥对泄露后攻击者可以直接登录机器,安全性要求不高的场合可以不用,如果需要防止私钥泄露的风险但是又懒得输密码的话,可以用SSH-Agent。 这一步完成后会在指定目录下生成一个没有扩展名的私钥文件和一个扩展名为.pub的公钥文件,默认配置下是生成在~/.ssh目录下的id_rsa和id_rsa.pub两个文件。
- 注册公钥 将生成的
.pub公钥文件上传到SSH服务器,然后使用以下命令进行修改权限和注册:
1
2
| chmod 600 ./id_rsa.pub
cat ./id_rsa.pub > ~/.ssh/authorized_keys
|
- 在本机的
./ssh/config文件中追加相关密钥对免密码登录配置:
1
2
3
4
5
| Host <host_name>
HostName <ip>
Port 22
User <user>
IdentityFile <rsa file> # 这里写之前生成密钥对生成的私钥路径
|
- 之后就可以在本地机VSCode的
Remote SSH扩展中看到配置的SSH机器了,点击即可免密登录。
安全软件:fail2ban
fail2ban可以防止爆破尝试密码,默认配置下,如果来自一个IP连续5次进行了错误的登录尝试,则禁止该IP进行SSH登录1分钟。
1
2
3
| To force fail2ban to ban repeated failed log in from local IPs, comment (prepend with #) the following line:
ignoreip = 127.0.0.1/8 ::1
in /etc/fail2ban/jail.conf
|
常用工具全家桶安装
apt直接管理的工具
1
| sudo apt install curl htop vim git s-tui nload net-tools build-essential git-lfs tmux proxychains4 -y
|
虚拟局域网组网工具(适用跨域远程访问)
ZeroTier
ZeroTier官网
安装
1
| curl -fsSL https://tailscale.com/install.sh | sh
|
配置
1
| sudo zerotier-cli join <在ZeroTier官网配置的网络ID>
|
坑点
Tailscale
Tailscale官网
安装
1
| curl -s https://install.zerotier.com | sudo bash
|
配置
1
2
| sudo tailscale up
# 然后在终端给出的链接中登录个人账户,根据提示将当前设备加入Tailnet内,即可完成设置
|
坑点
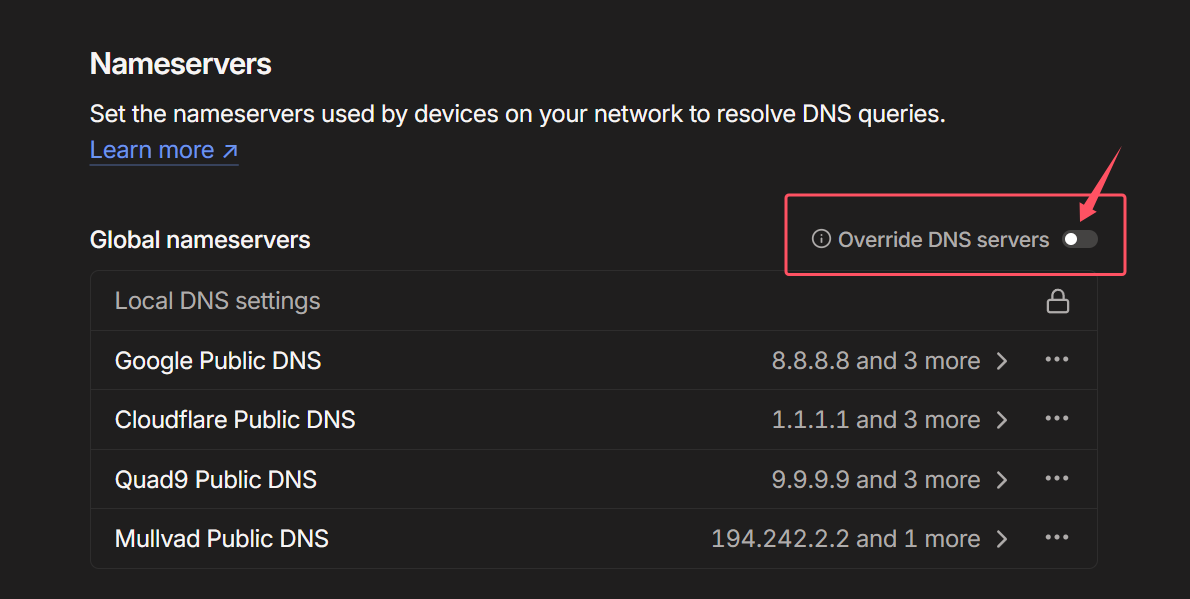
- DNS问题
Tailscale默认会将/etc/resolv.conf中系统的DNS nameserver设置为其默认地址100.100.100.100,这有可能导致一些需要内网专用DNS服务器解析的应用解析失败(例如校园网登录页面),所以需要到Tailscale设置中禁用DNS:
然后恢复/etc/resolv.conf的原始内容:
1
2
3
4
5
6
7
8
9
10
11
12
13
14
15
16
17
18
19
20
21
22
23
| # This is /run/systemd/resolve/stub-resolv.conf managed by man:systemd-resolved(8).
# Do not edit.
#
# This file might be symlinked as /etc/resolv.conf. If you're looking at
# /etc/resolv.conf and seeing this text, you have followed the symlink.
#
# This is a dynamic resolv.conf file for connecting local clients to the
# internal DNS stub resolver of systemd-resolved. This file lists all
# configured search domains.
#
# Run "resolvectl status" to see details about the uplink DNS servers
# currently in use.
#
# Third party programs should typically not access this file directly, but only
# through the symlink at /etc/resolv.conf. To manage man:resolv.conf(5) in a
# different way, replace this symlink by a static file or a different symlink.
#
# See man:systemd-resolved.service(8) for details about the supported modes of
# operation for /etc/resolv.conf.
nameserver 127.0.0.53
options edns0 trust-ad
search .
|
恢复完后重启DNS解析服务并检查状态:
1
2
| sudo systemctl restart systemd-resolved
resolvectl status
|
Docker配置
Docker官方参考文档 Docker引擎安装官方文档